General Finishes Gel Stain: Kitchen Cabinet Makeover
Are you thinking about refinishing your kitchen cabinets, but don’t want to spend the time stripping and sanding off the old finish? I have the perfect solution! General Finishes Gel Stain can give your kitchen cabinets a fresh and updated look.Read on, to find out how I refinished my kitchen cabinets for less than $80 without stripping or sanding.
I decided I wanted to refinish our kitchen cabinets to match our hardwood floors. At first, I wanted to paint them white, but our painter and realtor suggested staining. Both our painter and realtor had painted their cabinets white and they were always having to clean them. However, if you’d like to look at a few popular paint colors for kitchen cabinets, checkout this article.
I’d just spent almost a month refinishing our oak coffee table, end table and dining room table so I wasn’t ecstatic about the idea of starting a new project. Stripping, sanding, staining and applying a top coat is a very time consuming process so I started looking into other options.
I decided I would try using the Minwax Gel Stain because you didn’t have to completely remove the existing finish to change the color of the cabinets. I picked up a can of the walnut color gel stain and tested it on the back of one of the cabinet doors. It didn’t seem to make much of a difference. I applied a second coat the next day, hoping the color would be darker but it still didn’t make much of a difference and I was pretty discouraged.
The picture below shows the General Finishes Antique Walnut Gel Stain on the left, and the Minwax Walnut Gel Stain on the right. Granted, they are 2 different colors from 2 different companies but you can clearly see which one covered better in 1 coat.

I decided to do a little more research, and that’s when I came across General Finishes. General Finishes Gel Stain had RAVE reviews on every website I searched.
I went to the General Finishes website to search for a store that carried their products near me. I picked up a can of the Java Gel Stain and a can of the Antique Walnut Gel Stain. I tested both colors on the back of another cabinet door and I immediately saw a difference. What surprised me the most was the difference in quality between the Minwax Gel Stain and the General Finishes Gel Stain. As it turns out, General Finishes has a much higher solid content than Minwax does, which is part of the reason that it covers so well.
Now, I wanted the color of the cabinets to match our hardwood floors. Our hardwood floors are a dark brown, and the cabinets were Golden Oak; Gross! I started with the Java Gel Stain color, and it had a little too much red in it for my purpose. That’s when I tried the Antique Walnut color, and it was perfect! Now that you have a little background info on my project, lets get into the ‘How To’ details!
Materials You Will Need:
There’s a lot of different techniques you can try with Gel Stain. Regardless of the technique you use, here are a few supplies that you will need:

Cleaning your cabinets:
The first thing you’ll want to do is clean the cabinets with TSP. I found it easier to mix the TSP and water in a spray bottle because it was always mixed up and ready to use!
I’m all about finding the best methods and techniques so I thought I would try cleaning one of the cabinets with an all purpose cleaner rather than the TSP to see if it was really necessary to use the TSP mixture. My findings? USE TSP! There was a big difference between the two cleaners and it was obvious that TSP did a better job.
After cleaning the cabinets with TSP, you’ll want do a light sanding. This helps the Gel Stain stick to the surface. I’d also like to share my thoughts on using liquid sander also known as deglosser. My personal opinion is that they’re not worth it.
I think sandpaper does a better job preparing the surface than any deglosser on the market. However, I know people that have had great luck with deglosser’s. It’s hard to say one way or another. I’d recommend trying both options, the deglosser on one side and sandpaper on the other. Compare the two, and see which one works best for you.
Application:
My biggest concern was that the Gel Stain was going to look more like a paint than a stain. I wanted to be able to see the wood grain. I tried many different application techniques to see which one gave me the look I wanted. The picture directly below on the left is after applying 1 coat of antique walnut and wiping it with a paper towel. The picture on the right shows what the cabinet looks like after applying a second coat.
I cannot stress enough how important Dry Time is.
- Dry-time to touch: 4-6 hours
- Dry-time to recoat with stain: 12 to 24 hours.
- Dry-time to apply oil based topcoat: 12-24 hours
- Dry time to apply water based topcoat: 72 hours
- Dry time for light use: 7-10 days
- Cure Time: 30 days.
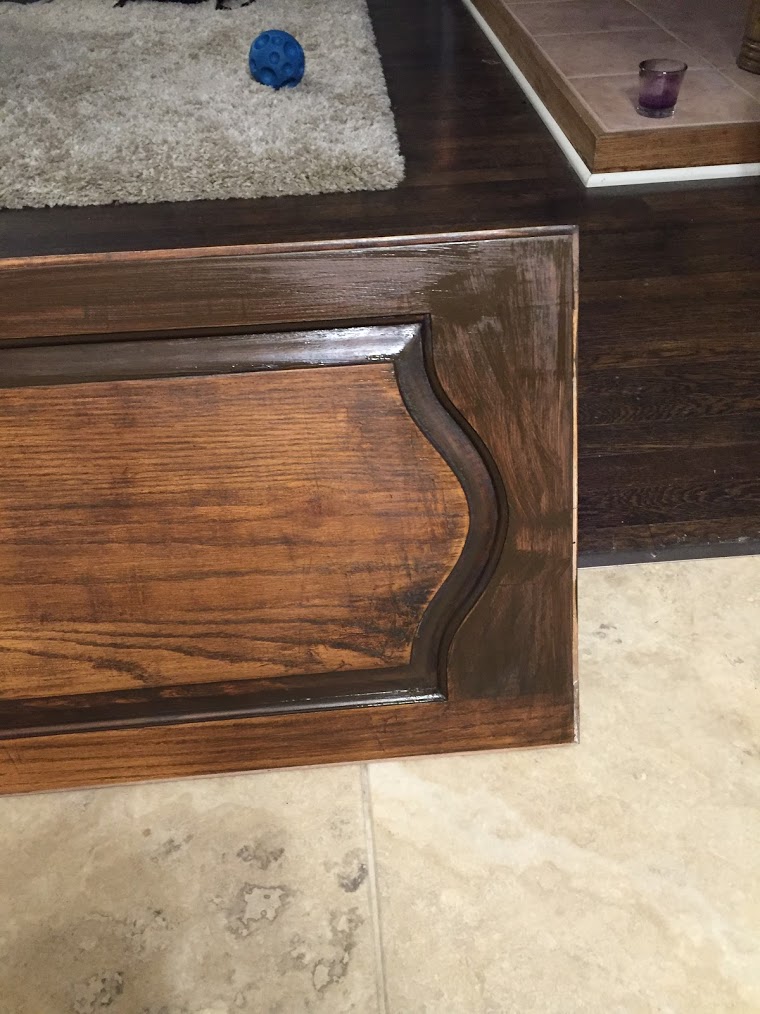
Stain applied to cabinet door and wiped off excess other than the top

I wanted the color to be close to the color of my hardwood floors.
Once I got the color the way I wanted it, I decided to work in sections so I wouldn’t overwhelm myself. I started by removing all of the cabinet doors on one side of the kitchen and I put all of the hardware in a ziploc bag so I wouldn’t lose anything. I also wanted to stain the insides of the cabinets because I think they look better when the outside matches the inside.
I applied the stain using a foam brush and wiped it off with a paper towel. I also tried wiping the stain with a lint free rag but it seemed like it was absorbing too much of the stain.
1 Coat

2 Coats

I also wanted to mention that I used saw horses (click here to check the price on the saw horses I used) with a piece of plywood as a makeshift table in the kitchen. It worked well because I didn’t have to worry about getting any stain on the plywood because it was just a scrap piece of wood. I was able to lay the stained cabinet doors that were drying, on the bottom half of the saw horses so I always had a work space on top of the table.
Side Note…
Even though our cabinet pulls were already a satin brushed nickel color, the hinges weren’t. We wanted them to match which is why we used Rustoleum’s Universal Spray paint in the Satin Nickel Metallic color.
Top Coat
Finally, once all of the cabinets were stained, I used General Finishes “High Performance Water Based Flat Top Coat”. To be honest, I was reluctant to use a water based top coat. I didn’t have good luck with the ones I had used in the past. On the other hand, I also didn’t want to use an oil base top coat because of the strong odor, and the way that it yellows over time.
I am so glad I used the High Performance polyurethane because it was everything I was looking for in a top coat. It had little to no odor, and it was quick and painless to apply. I applied 3 coats per the instructions on the can. This water base top coat also protects against water and heat which is an important factor to have in a kitchen.


Thank you so much for reading about my kitchen cabinet makeover! Feel free to leave any questions or comments below! As you may or may not have read in the ‘About’ page, I am a paint department manager. I only recommend products that I’ve personally used and know work well. If you have questions regarding your own project, send me an email and I’m more than happy to help! Oh, and make sure to follow us on Pinterest and Facebook!


12 Responses
Your article was very interesting. I am thinking of redoing my cabinets also. I am wondering if you can go lighter with the colors? I see the darker color worked great, but will it work the other way around? Please let me know your thoughts on this
Hi Bernie! Honestly, I haven’t tried going lighter from darker. What I would do is a test spot on the inside of one of the cabinets to see if it gives you the color you’re looking for. If not, you’ll need to remove the existing finish by sanding or stripping. I hope that helps!
I just finished staining an unpainted kitchen island with General Finishes gel stain in brown mahogany. I understand that this gel stain has a urethane already in it. The instructions say to buff it to get a nice finish. I have done this but it doesn’t have the luster that I would like. I don’t want a high gloss – just a soft matte finish. What should I use? The Good Wood store where I purchased the island and also the gel stain didn’t have any kind of protectant that I could purchase to get this affect. Can I safely use another brand of polyurethane with the General Finishes product. I am 85 years old and don’t know exactly what to do. The staining job on the island itself looks quite nice and matches my kitchen cabinets very nicely. However it needs just a little “shine”. Appreciate your help.
Hi Ramona! You can use any brand of polyurethane to go over General Finishes. If you don’t want it too shiny, I wouldn’t recommend an oil-based polyurethane. Oil is going to be shiny. I’d recommend General Finishes “High Performance”. It’s a durable water-based top coat, but again, you don’t have to use their specific brand. There are other companies that make water-based polyurethanes. Water-based will give it that finishing touch with a little bit of shine, but not too much shine. I hope that helps!
How did the gel stain work on the sides of your cabinets where it’s more of a laminate, rather than actual wood? I’m thinking of using gel stain to redo my daughter’s oak cabinets (she wants a grey stain). I feel pretty sure I can sand down the doors/drawers if needed, but then not sure how to get the sides of the cabinets to match.
Hi Jaymie! The gel stain worked perfectly on the “laminate wood”. The gel stain is almost like a cross between paint and stain. It’s thick enough to coat any surface, while still being opaque like a wood stain. If you’re going to sand down the doors/drawers, I would do it very lightly. Just enough to scuff up the surface to help the stain stick, that way the doors/drawers will match the laminate better.
Your cabinets turned out great! How long did you have to wait to paint the inside of the doors? I guess what I’m asking is did you paint all of the fronts, wait 24 hours paint the second coat, wait 24 hours to flip over and repeat?
Yes, unfortunately, it is a time-consuming project. I did a second coat after 24 hours. Technically, General Finishes recommends 72 hours between coats, but I didn’t have any issues after 24 hours. I did all of the fronts first and then I did the backs, and the inside last.
I am considering refinishing my oak kitchen cabinets. Are you still pleased with how your cabinets are holding up after refinishing?
Yes! I’m impressed with how well they’ve held up since I refinished them a few years ago. I still get compliments on the cabinets to this day. I think part of the reason they’ve held up so well is because of the top coat I used.
How did you apply the second coat? I did this several years ago and was to impatient to do a second coat as I felt like I was not getting anything other than the same result as with the first. I would love mine to be darker and am going to try again. I want all mine dark! What color did you go with? Thanks
I am sold on General Finishes! I have redone so many projects- bar cabinets, bathroom cabinets and fireplace mantle with Java gel stain. Easy peasy and so beautiful! I’m getting ready to redo the kitchen cabinets with milk paint. Hopefully I will be as happy with that outcome!