Make Your Own Chevron Charcuterie Board
This post will walk you through how to make your own chevron style charcuterie board step by step. However, I’m going to be accepting requests to order your own board, for those of you that don’t want to make one, or don’t have the tools but would like to have one. If you’re interested in ordering and purchasing your own chevron board, please click the button below to be taken to my contact form where I’ll provide you with more information!
Materials:
- Purple Heart
- Wenge
- Router
- 3/8” Round-over router bit
- **Make sure you choose the right size shank for your router. Either a 1/2” shank or 1/4” shank
- Titebond 3
- CA Glue
- Mineral Oil
- Walrus Oil Wood Wax
- Clamps
- Orbital sander
- Optional:
You can obviously use any color(s) of wood you want. I personally wanted to use purple heart and wenge because I like how they look together.
Cut list:
Purple Heart:
- (22) 1/2” wide by 5 1/2” long at a 45 degree angle
- (2) 2 3/16” wide by 18” long
Wenge:
- (22) 1/4” wide by 5 1/2” long at a 45 degree angle
- (2) 1/4” wide by 17 1/2” long
- (1) 1/2” wide by 25” long
Creating a Chevron Pattern
I used both purple heart and wenge to create this piece. The chevron pattern consists of 22 pieces of purple heart cut at 1/2” wide x 5 1/2” long, and 22 pieces of wenge cut at 1/4” wide and 5 1/2” long. All of wood was cut to a 45 degree angle.

First Glue Up
Initially, I wasn’t sure how long I wanted the pattern to be which is why you see different lengths. However, it’ll be so much easier to glue the pieces together when they’re all cut to the same length. I placed a board on both the left and right side of the pattern to hold it together.
I used CA glue to glue down one of the triangles that I used on the ends to hold everything together. I did not glue the other triangle because I wanted to uses it as leverage when clamping.

Cutting the Pattern in Half
I cut a piece of MDF (but any scrap piece of wood that’s long enough to fit the fully glued pattern will work) and put a piece of tape on the MDF, and another piece of tape on the back of the chevron pattern. I put CA glue on the tape to glue the pattern onto the MDF. Doing it that way makes it easier to remove the pattern once it’s been cut. I then used a chalk line to cut roughly 1/2” off of both sides so they were both even. This allowed me to place one of the edges against the fence to ensure a straight and accurate cut.


Final Glue Up
I prefer to use 1/4” pipe clamps, but sometimes I use ratcheting bar clamps, also known as F-Style clamps. The F style clamps work with only Rockler’s 3-way attachment which is used to hold clamping cauls down to keep the boards as flat as possible.

Once the glue was dry, I ran the board through the planer to ensure an even thickness.

I sketched out a template for the handle and used it as a guide to cut out on the bandsaw. A jigsaw would work just as well.


Once the handle was cut, I used a 3/8” round over bit along the outside edge of the entire piece.

Baking Purple Heart Wood
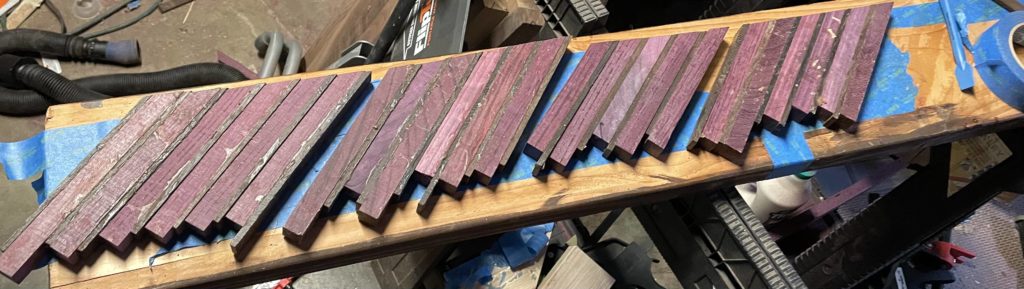
This was the first time I’ve ever tried baking purple heart in the oven. Purple heart has a tendency to turn brown over time. However, when it’s exposed to heat, it can bring out more of the purple coloring. Depending on what temperature you bake it at and for how long, that will affect how deep the purple color will be.
I put it in the oven at 250 degrees and baked it for 10min. I then flipped it over and baked it for another 10min. I was surprised to see moisture coming out of the wood. I assumed it was just water, but it was sticky and similar to sap.
I decided I wanted the purple to be a bit darker, so I turned the temperature up to 300 degrees and baked each side for 15 min. The sap like substance was easy to sand and did not effect the board in any way.
I was pretty nervous to bake the wood, because I didn’t know how the Titebond 3 would hold up in the heat. Thankfully, the glue held up just fine and the board did not warp or bend. If you decide to bake purple heart, I would recommend that you do it once the piece has been completely glued together. I’ve read many stories about people baking purple heart before cutting and gluing, and the board winds up warping.
Please know that you’re taking a risk by putting wood in the oven. I obviously cannot guarantee your results will turn out the same as mine.

Applying a Finish to your Charcuterie Board
After sanding through all of the different grits, it was time to apply the finish. I first applied 2 coats of mineral oil. The next day, I applied 2 coats of walrus oil wood wax. You can see how bright the board turned out, and I’m positive that baking the wood made all the difference! Also, while mineral oil and walrus oil wood wax are both food safe, I will likely wind up hanging this piece to display rather than using it as a food surface. I’m just not confident that wenge and purple heart are not toxic.
I’m THRILLED with how this piece turned out. It’s easily one of the most favorite things I’ve made, and I hope you all like it as much as I do!


I’m going to be accepting requests to order your own board, for those of you that don’t want to make one, or don’t have the tools, but would like to have one. If you’re interested in ordering and purchasing your own chevron board, please click the button below to be taken to my contact form where I’ll provide you with more information!