7 Most Common Wood Staining Mistakes
While the basic principles of staining wood are fairly simple, there are a few common wood staining mistakes that beginners run into. Depending on the error, these mistakes can be costly, time consuming and just plain annoying. I want to review the most common wood staining mistakes made by beginner’s when attempting to stain and finish a project.
1. Not Sanding Enough
Sanding is one of the most important steps when staining wood. The purpose of sanding is to remove any imperfections and to open up the pores in the wood to allow the stain to penetrate. Typically you’ll start with a low grit, maybe around 60 or 80 and then you’ll move up to a softer grit.
Be careful not to use to soft of a grit or you’ll wind up closing the pores. The softest grit I go up to is 320.
How do you know when to move up to a higher grit? I like to take a pencil and draw a curvy line across the entire surface. Once I’ve sanded enough that the pencil mark is no longer visible, I know that I can move up to the next grit.
Also, be careful when staining wood after using wood glue. If you don’t remove ALL of the glue, the stain will not penetrate and it
2. Wood Stains Do Not Protect Wood
One of the biggest misconceptions about wood stains is that they protect wood. Stains do not protect wood, stains color wood. Unless you use something that has a top coat finish built in such as Minwax Polyshades, General Finishes Gel Stain or a Danish oil, you’ll want to apply a top coat to protect the wood from scratches, UV damage, spills, water etc.
Also, I’d advise not to use a wood stain on an surface that could come into contact with food. i.e. a cutting board, charcuterie board, butcher block etc. There are natural stains like coffee grounds, that are food safe. If you want more information about food safe wood stain and sealers, click here.
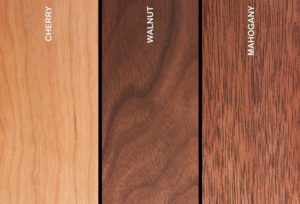
3. Stain Sample Colors Are Not Accurate
First, ask yourself if you really want to change the color of the wood. A lot of woodworkers will select their wood based on what the natural color looks like. Applying a clear top coat makes the natural color come to life. Staining wood is purely based on your own personal preference.
If you decide to stain and change the color of the wood, you’ll see a lot of different color samples at the hardware store. These sample colors are not very accurate. Stain colors look different on different types of wood.
My suggestion is to take a piece of the wood you’re working with to the hardware store. A lot of stores will have sample cans that you can apply to see what the color will look like.
4. Proper Disposal
If you use a rag to stain your wood, it must be disposed of properly. Most wood stains are exothermic (meaning it generates its own heat) and when the stain dries on the rag it can become a fire hazard. It is recommended that you place used rags in a metal container with a lid or even in a plastic bucket that is partially filled with water.
5. Apply a Wood Conditioner

If you want a uniform color, you’ll need to apply a wood conditioner prior to applying your stain and before the wood conditioner dries. Wood conditioner typically dries within 2 hours. Wood conditioners prevent streaks and blotches by evening out the absorption of oil-based stains. While wood conditioner can be used on any type of wood, it’s imperative to use it on soft porous woods like pine, alder, birch, and maple.
6. Wipe off Excess Stain
If you want to get the best results when applying stain, you should apply one wet coat and wipe off any excess stain. If you don’t wipe off the excess stain, not only will the stain become tacky, but it will also look blotchy. Additionally some stains dry faster than others.
Oil based stain dry very slowly, where water based stains dry very quickly because it dries as the water evaporates. If you’re using a gel stain, you’ll still want to wipe off the excess stain, but there are a few different ways you can do it. You’ll want to check out this article I wrote on refinishing my kitchen cabinets.
7. You Can’t Undo Stain
Wood stain is not paint. Stain penetrates deep into the wood where paint sits on the surface. You can sand off paint if you’re not happy with it, but stain penetrates so deep into the pores that it’s nearly impossible to “remove the color”. This is why it’s important to do test spots of different colors before staining the entire piece.
Hopefully you have a better understanding of the most common wood staining mistakes. Make sure to follow us on Pinterest and Facebook for all of the latest!
Essential Staining Supply List
Needless to say, it’s easy to make mistakes if your new to staining wood. Hopefully you have a better understanding of the most common wood staining mistakes.
Make sure to follow us on Pinterest , Facebook and Instagram for all of the latest! Feel free to leave a question or comment below! I love hearing from you!


6 Responses
I always make sure that I wont miss a spot when I clean stuff at home especially the hardwood floors. We should be more diligent in doing so because if stains appears, we will be forced to cleaned them. We dont want to spend more time cleaning, right?
Number 8 biggest mistake
Don’t use Minwax stain!
Minwax stain is a “consumer “ grade stain, there are many better options, most notably gel stains like General or Old Masters when redoing furniture.. much better color strength, less blotching on soft woods due to the consistency, and gel stains use a urethane binder in the stain which makes them dry harder and adapts them for use over existing finishes or remnants of old finishes. Minwax stain can not be used oven er old finishes. OR even remnants of an old finish… only bare , clean/ stripped wood. Sanding an old finish does NOT remove it at the pore level , and you will have drying and/ or adhesion problems that will affect you final finish’s dry time hardness and durability.Stain conditioner should only be used on soft woods, and not on Maple, Oak, mahogany, walnit, cherry, etc…. their job is to inhibit the stains penetration, which means leaving the color lighter than it would normally be.To get a hardwood dark, we use dye stains, usually in combination with a pigmented stain, General makes a good waterborne dye stain in their lineup. BUT be warned, there is a learning curve to dye stains and they are unforgiving, will stain everything.. your hands a rug, the cat…one reason they are not sold at home or hardware stores. Just a few cents worth from a furniture restorer with almost 40 years experience.
Thanks for sharing, Greg! That’s a lot of good insight! I too, prefer General Finishes or Old Masters over Minwax.
AWESOME info, Greg. And sorry about the cat – LOL
May I use this with my wood working class? Your blog is very well written. I already added it to our bookmarks. We started our first wood working class at our school this year. Allot of fun teaching kids – well my daughter sometimes is adventurous and challenges dad. Loyal Chiangrai, Thailand
Hi, Loyal! Thank you so much for your kind words. I would be thrilled if you wanted to use any of my content for your class! I think it’s wonderful that your teaching kids, and spending quality time with your daughter!
Alyssa.